Sunday, June 12, 2011

My Big Update!

P.S. Before I proceed with my assignment, I will like to say that I have updated my blog in one big update. The update consists of my entire assignment, the chrome shader exercise and the dice exercise. Thank you.

Self Critque

Now that my assignment is done, I felt that i should have chosen a different object. The reason being that i found mine to be a little simple compared to what my other coursemates have chosen. However, I DO admit that the pattern on the top of the tray was the toughest part for me. Adjusting each individual pattern to make them connect was tedious. But in general, i felt that i could have done something else better then i did with my tray model. That is what i feel though.... hehe

Ok now my critque about the model itself. There were parts of the model which i cannot quite figure out how or what to do about it. Other then the frequent Difference/Union failure where both selected objects disappears, is it possible to change the size of a face so that i can delete it when i cannot use difference? And since i could not use Union too, I had to combine the pattern to the tray cover instead. I have also heard that using Difference in Maya is not a good practice and i hope to learn more about it in the future.

While modelling my model, i have also been taught to "clean up" my model. Other than reducing the number of edges on the model dramatically and being a ease for my eye, I do not know what other benefits "cleaning up" gives. Perhaps it prevents messes and accidents when one is professionally modelling? Got to dig deeper into this...

And lastly, the pattern on my tray cover. Before i started working on the pattern, i thought that i could do one part of the pattern and revolve it five to six times around a pivot point. However, after trying to do that, i found that it was not possible to get that done (or is it?). Hence i had to manually duplicate the pattern five times and edit each pattern's joint so that it could connect with one another. I hope that i will learn an easier way to do this in the future.

Oh .... i have found an error in the final pattern i made and i tried to correct it but apparently Maya is preventing me to do so. Until now, I still cannot use the Edge, Vertex or Face function in my Maya as whenever I click on an edge, vertex or face, it turns to this...

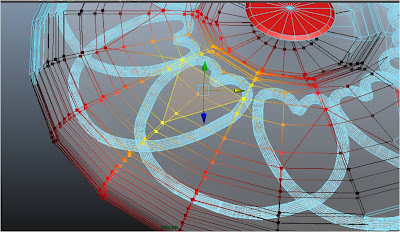
It looks like Soft Modification and I don't know if it is, but I hope to learn how to revert it back to it's original function.

Still, I am quite pleased with my final outcome and I hope you are too! Thank you!!

Assignment (Tray)

Assignment

Overall Base

Firstly, I created the shell for the cover of my tray. I created the bottom outline using the CV Curve tool and vertex.

Next, I created the shell for the bottom base of the tray. I have also created a hinge which I left out in my drawings, to secure the tray’s cover when it is placed above.


After completing the shells, I revolved it and the shape of the tray is formed. The hole in the centre is for the placement of handle used to lift the cover up. This is the bottom view of the tray.

And the top....


Handle

Next, I started with the handle. Both the handle and the handle joint were fairly easy to make. Both of them are made by creating a cylinder and using the vertex tool to narrow one side of it.


Before combining the handle and the handle joint, I have removed the faces at the bottom of the handle piece and have also removed the faces at the top AND bottom of the handle joint, which will be connected to the top of the tray cover.


After creating the handle, I combined the handle, handle joint and the top of the tray using the Outliner.


'Wall' and Separators


By selecting the side of the tray, I then extruded the sides of the base tray to form the wall which will direct the rat race to another direction.


For the separators of the tray, I created a rectangle which is the general shape of the separators. Next, I use the Insert Edge Loop Tool to insert a edge on the separator, since it is not actually straight. Lastly, I moved the edge I created upwards, making a bump on the separator.


I have deleted the bottom and side faces before connecting the separators with the base of the tray.


Texturing

After completing the model, I textured both the tray base and the cover. First, I textured the base of the tray red, along with the handle of the tray.


Next, I created a blinn texture which is white and colour and increase the transparency of the texture. This gives the texture a translucent look when applied on a object. I then applied this texture on the tray cover and the “wall” on the side of the base.


Cleaning up my model

When I first revolved my model, the entire model was “dirty”. Their were too many unused line on the model and they have to be cleared.


After tediously “cleaning up” my tray, the outcome is a clearer gridded tray which makes viewing much easier.


Pattern

Next, for the pattern that is on the tray, I used the EV Curve tool and formed the pattern. I then created a cylinder and extruded one face of it following the pattern, turning my pattern into a polygon. I set the number of divisions to 100 for the pattern to be smoother.

Cylinder created at one tip of the pattern......

And extruded following the pattern.


After creating one part of the pattern, I duplicated it five times and arranged it according to the surface of the tray cover. I then connected all the ends of the pattern to each other using the vertex tool and combined all the patterns together, creating one completed pattern.


Placement and Final touch ups

Lastly, I placed the pattern in place and applied the same texture the tray has to the pattern, giving it the same transparency.


After completing the entire top cover of the tray, I used the Outliner and combined the pattern and to tray cover together.


Edit: I have decided the change the texture of the “wall” to the same texture used for the tray.


After completing my model, I hid all the CV Curves I made by selecting all of them and using the Display -> Hide -> Hide Selection option.


Final Output

And Tah Dah~!~!~!~! My tray model!

Friday, June 10, 2011

Week 5: Chrome Shader

Chrome Shader

The Chrome Shader exercise was and interesting and important one as it not only teaches us how to render an object, but how to make it look realistic (to a certain extend). Along with the Dice exercise, this is done in the school lab and i do not have many screenshots of the process of making the final outcome.

Final Outcome

This was before rendering...

This was after rendering without ray-tracing on...


And this is after rendering with ray-tracing on...

Reflection

As clearly shown, ray-tracing plays a huge role in the rendering of a reflective item but not much was elaborated on it. I have played around with the various options such as eccentricity and it really does affect the outcome of the rendered image.
The video was tiring and difficult(correct word to use?) to watch as i could neither playback nor fast forward it and had to play it over and over again if I missed a tiny detail. But in overall, this exercise definitely change how I will model and render my models from now on.

References
Other than the video posted on OLIVE, i had help from my teacher and classmates as this was done entirely in school.

Thursday, June 9, 2011

Week 5: Dice

Dice

This exercise was an interesting one as it teaches us how to apply a single texture on all four sides of the cube. I do not have the screenshots of the process of applying the texture but I have the final outcome of the dice.


Texture applied

Even though it is not displayed here, the blanks spaces in the template here will not affect the outcome of the dice as the sides of the dice is arranged to replicate the arrangement of the numbers in the template here.


Final Outcome:


Reference

Since this exercise is done entirely in class, my only references were my teacher and classmates.